
 Magyar
In this post I will show you how you can create a custom API in Dataverse. I showed you in this previous post how to create a custom action and trigger custom business logic with custom message. Microsoft introduced a new way to that with a bit more funcionality, which can subsitute the old way how we created custom messages with actions in Dataverse.
Main Differences
Since the purpuse of custom API is very similar to the old custom action, they can be compared easily. See what is new or different in custom API:
- A custom API can be set to private or public,
- Type of API can be “Function” or”Action” (“Is Function” switch),
- Can be used or not in workflows,
- Bounding custom logic is simple by selecting a registered plugin, no steps needed, so we can easily create custom API with existing plugin to open it more widely,
- Creating a “process” is not required, because it is stored on a new table “Custom API”.
Creating Custom API
Now let’s see how we can call an already registered plugin in a new custom API.
Plugin
The existing logic receives a text and coverts it to upper case, then returns it:
using Microsoft.Xrm.Sdk;
using System;

namespace kogerohu.Actions
{
    public class TextToUpperCase : IPlugin
    {
        /// <summary>
        /// Action to convert an input text to upper case and return
        /// </summary>
        public void Execute(IServiceProvider serviceProvider)
        {
            IPluginExecutionContext executionContext = (IPluginExecutionContext)serviceProvider.GetService(typeof(IPluginExecutionContext));

            var inputText = (string)executionContext.InputParameters["inputText"];

            if (string.IsNullOrWhiteSpace(inputText)) return;

            var outputText = inputText.ToUpper();

            executionContext.OutputParameters["outputText"] = outputText;
        }
    }
}
The whole project is available on my GitHub repo.
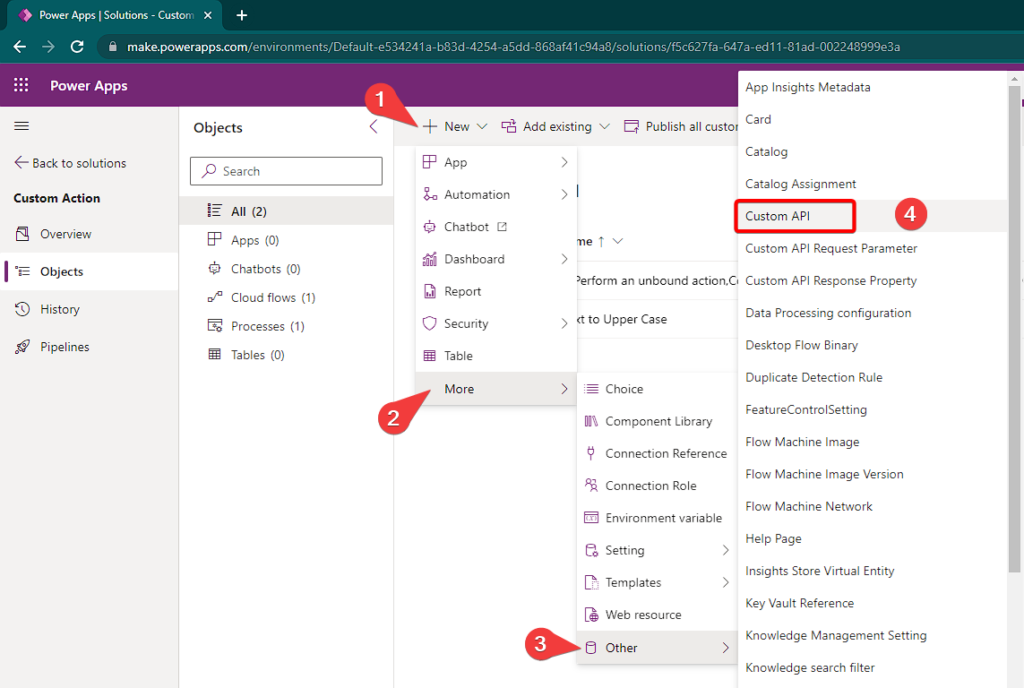
Creating new Custom API record
Let’s opne the maker portal, then create or select a solution. After that navigate through New > More > Other > select Custom API:
After clicking on it a new tab will be opened with a form that must be filled in carefully:
- The field “Unique Name” is a simple text field at the moment and it must contain a valid publisher prefix, too!
- In this case the field “Bindig Type” must be”Global” (similarly to custom action example).
- The lookup field “Plugin Type” is to be the plugin whith the custom logic to be called.
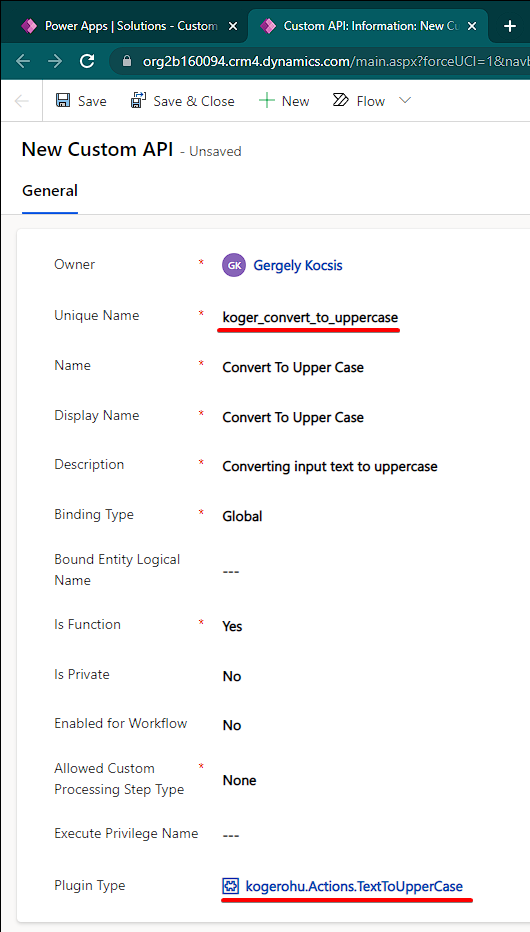
The field “PluginType” references to a plugin assembly and automatically creates the necessary plugin step for us:

Properties and limitations
| Unique Name | Schema name with publisher prefix |
| Binding type | Global / Entity / Entity collection Similarly to custom action process we can bound it to a table or can be global. |
| Bound entity Logical Name | If “Bindig type” is not “Global”, then the table schema name. |
| Is Function | Yes / No Function: callable with HTTP GET method, no data change, input parameters can be passed with query parameters in the URL if there is any. Limitations: – URL can be up to 2000 character long. Over that choose Action instead. – Cannot use for workflows – Cannot use in Power Automate cloud flows (unbound / bound action) – Output paramter required Action: callable with HTTP POST method, input parameters can be passed in the request body. |
| Is Private | Yes / No If yes, then it will be available only for its owner, which is useful for testing and development, later you can switch any time. |
| Enabled for Workflow | Yes / No You can use it in workflows as step. If it is enabled, then it cannot be a function. |
| Allowed Custom Processing step Type | None / Async Only / Sync and Async You can limit how it can be run. |
| Execute Privilege Name |
You can limit execution to a privlege. For example if there is a table “koger_license”, we want to bind execution to its read privilege then the privilege name is “prvReadkogero_license”. |
| Plugin Type | Lookup for plugin logic to run. |
Creating Parameters
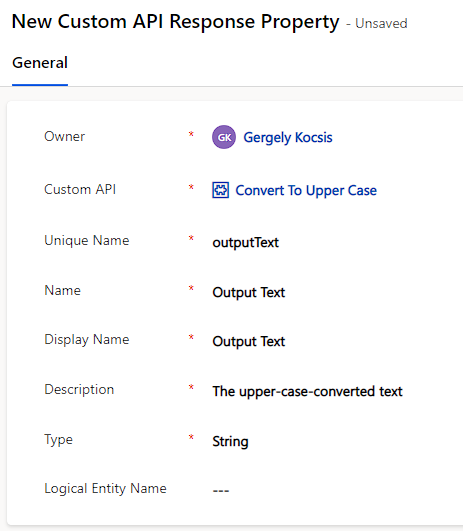
You can create input and output parameter as records seperately for custom APIs.
Input Parameter
There is a talbe for input parameters called “Custom API Request Parameter”, which has to be named as “inputText” for our logic. Keep always in mind that “Unique Name” must be the same that you use in your plugin getting from “InputParameters”.

Output Parameter
There is a table for output parameters: “Custom API Response Property”. This case this will be the “outputText”. Take care of the field “Unique Name” which must be the same which you use in the code to pass to “OutputParameters”.
Testing from browser
Since our custom API is a function, we can use simply an HTTP GET request with query parameter in the URL. This can be done with a web broswer, too. The URL with my environment:
https://org2b160094.crm4.dynamics.com/api/data/v9.2/koger_convert_to_uppercase(inputText=’PowerApps’)
Note: see carefully how I passed the input parameter. In case of more parameters you can specify them one-by-one seperated by commas.
Response:
{
"@odata.context": "https://org2b160094.crm4.dynamics.com/api/data/v9.2/$metadata#Microsoft.Dynamics.CRM.koger_convert_to_uppercaseResponse",
"outputText": "POWERAPPS"
}
We successfully received the upper case text in the body in the property “outputText”.
Conclusion
We have successfully created a Custom API that calls an existing plugin logic. We reviewed the possible configurations and ha a look at how to call a function-type custom API from the browser. So now we can have a reusable API that we can make available for all developers!
Sources

Leave a Reply