
 Magyar
In this post I will show you how to write a plugin from scratch for Power Apps model-driven applications like Dynamics 365 or other custom built applications. It can happen you reach the limits of no-code solutions and you need to extend the OOB functionality with custom business logic. In this example we create a plugin, which will copy a telephone number to a contact record from the related account record. But what is a plugin? A plugin is a piece of code written in C# that can be compiled to a DLL file, then uploaded to Dataverse and bound to different events to be executed. I try to explain step-by-step to make it understandable for juniors and citizen developers as well.
Execution Pipeline in Dataverse
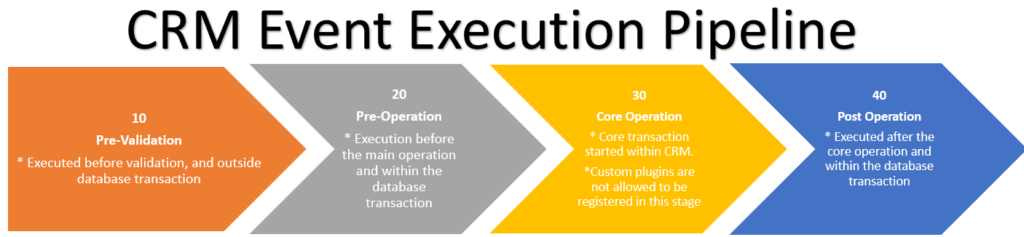
Before we jump in it, first I need to mention some words about the “Event Framework” to make clear how and when our code can run, which is provided by Dataverse. It helps us to bind our code to run on specific events e.g. creating, updating, deleting, retrieving a record in the system and we can also define more precisely when to run: before our record is being saved or after that. For this we can use 3 stages of 4:
| Name | Description |
|---|---|
| PreValidation | In the first stage we can validate user privileges and input data, and we can easily return error message for the user. |
| PreOperation | Here we can make changes, which are already inside database transaction and will be rolled back in case of any errors. Roll backs are resource intensive operations, so do not do data validations here. |
| MainOperation | Main Operation where our changes are being saved to database. |
| PostOperation | Operation after saving changes. Important note: asynchronous plugins must be run in this operation. |
Create Project in Visual Studio 2022
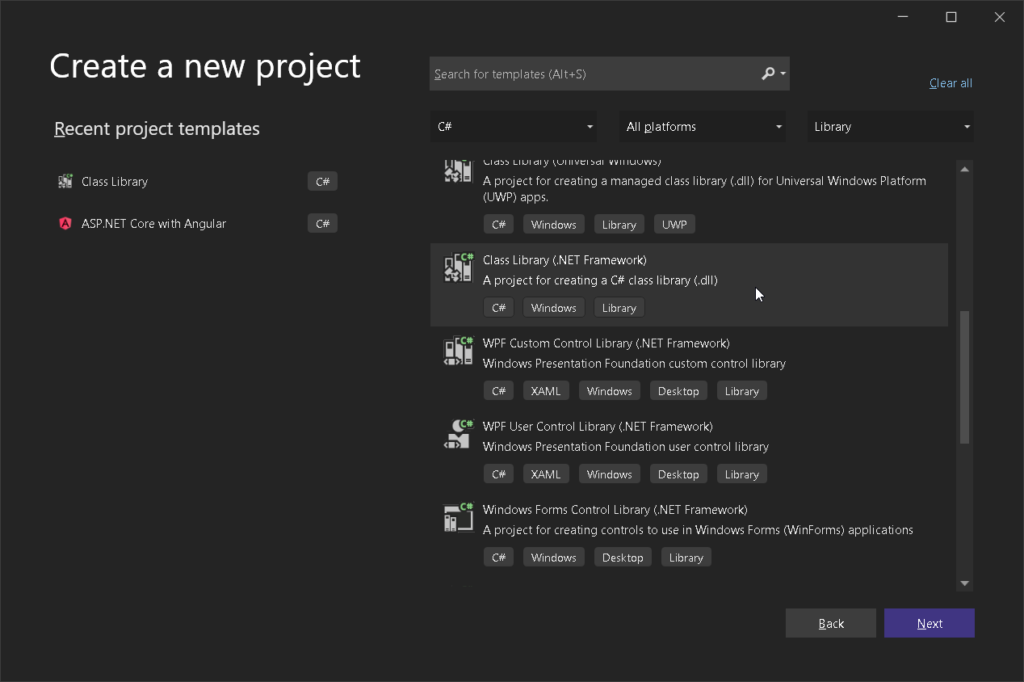
Create a project by selecting template “Class Library (.NET Framework)”:
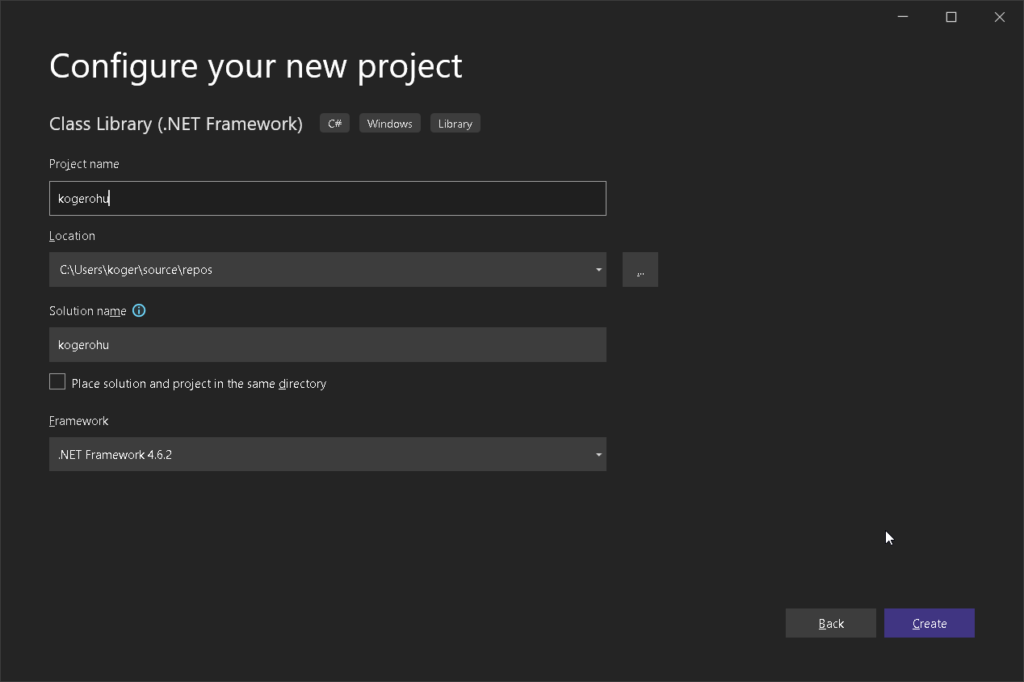
Select framework “.NET Framework 4.6.2”:
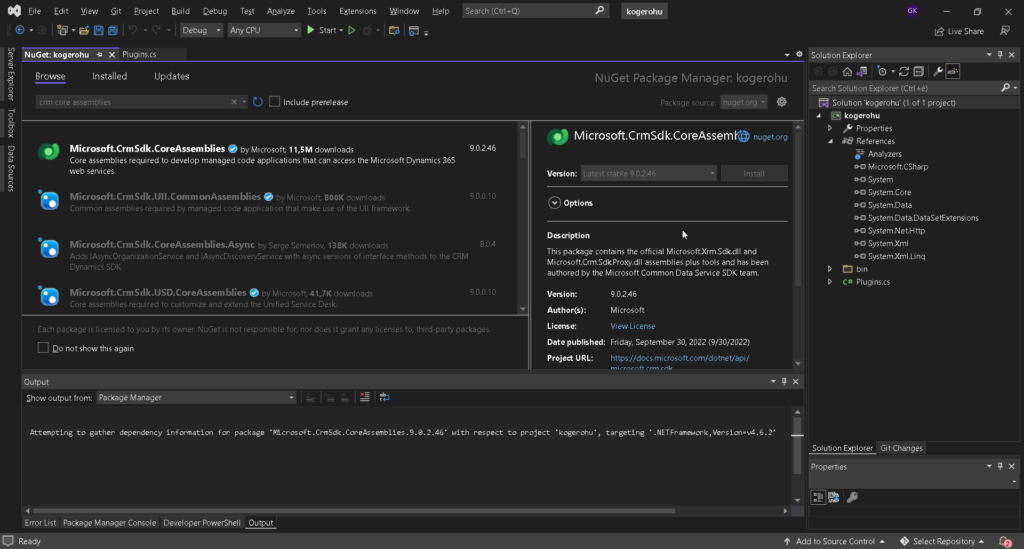
After creating the project we need to install the SDK that we have to use for developing the plugin: install “Microsoft.CrmSdk.CoreAssembly” NuGet package.
Write Business Logic for Plugin
The previously installed SDK contains “Xrm.Sdk”-t, which provides the basic objects and interfaces to connect to Dataverse and make operations.
Create a new class in the project and add “using Microsoft.Xrm.Sdk;” on top.
IPlugin interface
When we are creating a new plugin we need to implement an interface “IPlugin”, which contains a method “Execute”, and by its input parameter it can get the execution context and services. Organization Service (“IOrganizationService”) is one of the most used service in plugins. Important note that all the classes which implement “IPlugin” interface will be found as plugin in the Plugin Registration Tool.
The interface “IPluginExecutionContext” contains all the data changes user makes and more. This can be extracted from “Target” of “InputParameters” :
var isTarget = executionContext.InputParameters.Contains("Target");
var isTargetTypeEntity = executionContext.InputParameters["Target"] is Entity;

if (!isTarget || !isTargetTypeEntity) return;

// Obtain the target entity from the input parameters.
var target = (Entity)executionContext.InputParameters["Target"];
Important to check if the data even exists and its type every time. Records or rows has usually the object “Entity”. We get only raw objects from execution context, therefore we need to cast data every time we use them. The object “Entity” has an “Attributes” property, which is a dictionary with a key-pair values. It contains the field values from our forms. With this information we can get values in code like this:
var accountRef = (EntityReference)target.Attributes["parentcustomerid"];

// Getting account with phone number
var columns = new ColumnSet("telephone1");
var account = orgService.Retrieve("account", accountRef.Id, columns);
When we reference to another record in Dataverse we can do that with a “Lookup” field which will has a type “EntityReference” in the code. These reference objects store the referenced row ID and logical name.
When we use the object “ColumnSet” we can select which columns we need to reduce the amount of data. This can be crucial for performance. In our example we need only the field “telephone1”. Keep in mind that we need the logical name of columns here.
After retrieving our record we can get the phone number from the Attributes and add it to our contact record. Note: since we plan to run our code in PreOperation stage our changes are still unsaved.
if (account.Attributes["telephone1"] == null) return;

var mainPhone = (string)account.Attributes["telephone1"];
target.Attributes["company"] = mainPhone;
Whole Plugin code
The whole code together:
using Microsoft.Xrm.Sdk;
using Microsoft.Xrm.Sdk.Query;
using System;

namespace kogerohu
{
    /// <summary>
    /// Copy company phone from related Account main phone column if exists when Account is changed.
    /// This operation should commit before data will be saved => PreOperation
    /// </summary>
    public class ContactCopyCompanyPhone : IPlugin
    {
        public void Execute(IServiceProvider serviceProvider)
        {
            IPluginExecutionContext executionContext = (IPluginExecutionContext)serviceProvider.GetService(typeof(IPluginExecutionContext));

            // Obtain the Organization Service factory service from the service provider
            IOrganizationServiceFactory factory = (IOrganizationServiceFactory)serviceProvider.GetService(typeof(IOrganizationServiceFactory));
            IOrganizationService orgService = factory.CreateOrganizationService(executionContext.UserId);

            // The InputParameters collection contains all the data passed in the message request.
            var isTarget = executionContext.InputParameters.Contains("Target");
            var isTargetTypeEntity = executionContext.InputParameters["Target"] is Entity;

            if (!isTarget || !isTargetTypeEntity) return;

            // Obtain the target entity from the input parameters.
            var target = (Entity)executionContext.InputParameters["Target"];

            // If there is no related account do nothing
            if (!target.Attributes.ContainsKey("parentcustomerid")) return;

            var accountRef = (EntityReference)target.Attributes["parentcustomerid"];

            // Getting account with phone number
            var columns = new ColumnSet("telephone1");
            var account = orgService.Retrieve("account", accountRef.Id, columns);

            // If no main phone, do nothing
            if (account.Attributes["telephone1"] == null) return;

            var mainPhone = (string)account.Attributes["telephone1"];

            // Copy account's main phone to contact's company phone
            target.Attributes["company"] = mainPhone;

            // Since target goes further on the execution pipeline
            // And main stage is next, our data will be saved and
            // we don't have to save our data manually.
        }
    }
}
To keep the code simple, not all cases had been handled. The VS project can be found on my GitHub page here.
Build the Project
We need to compile our C# code to make it understandable for machines, so we create a DLL file. But to make the upload work properly first we need to sign strongly our project, otherwise we cannot register our assembly.
Sign the Project
To create a key file with extension”.snk” we need to execute the following in a developer console: “sn -k filename.snk”, which is in my case: “sn -k kogerohu.snk”.
After successful execution go to file explorer in Visual Studio, then right click on the project > select “Properties”.
In the newly opened window select “Signing” in the menu on the left, then scroll down to find checkbox “Sign the assembly”. Find and select your recently created name key file by selecting “Browse” in the drop down.
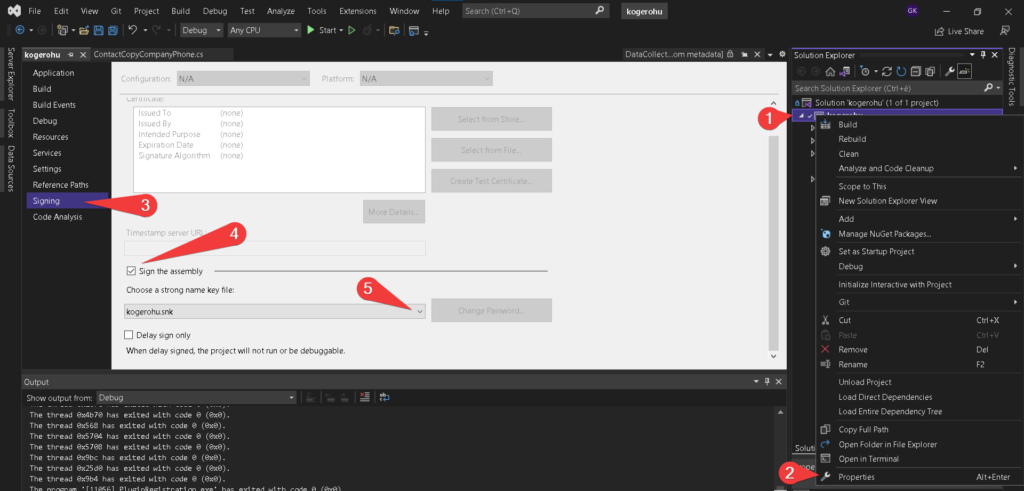
Do not forget to save your changes (Ctrl + S)!
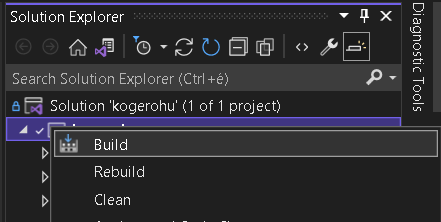
Build the Project
We have only a few click left: right click on the project in Solution Explorer and select “Build” command.
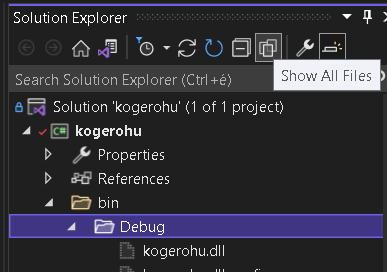
The result of building will be a DLL file under the project under folders “bin/Debug”. In my case the file is “kogerohu.dll”. (If you cannot see the bin and Debug folders, select “Show All Files” on the ribbon.)
Register Plugin
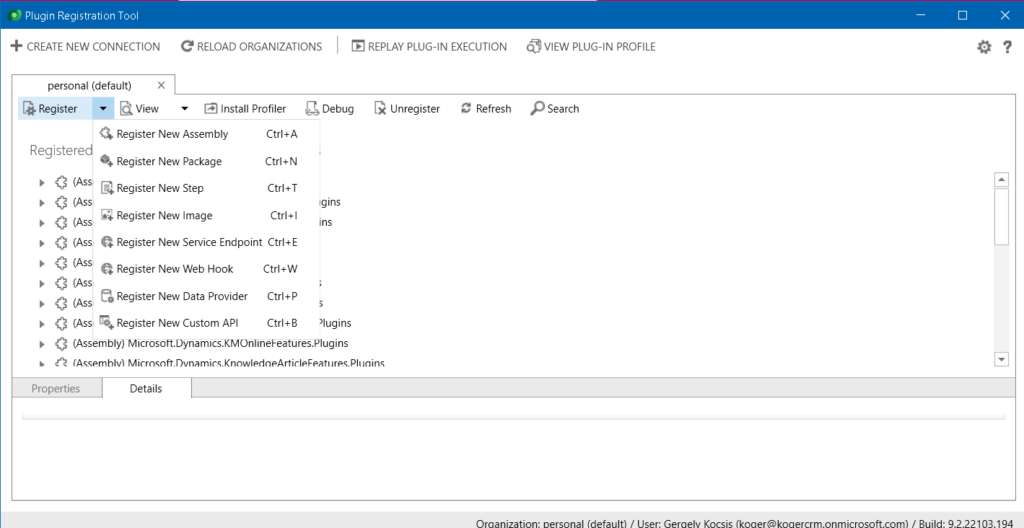
To upload our plugin we will use Plugin Registration Tool.
Download Plugin Registration Tool
The tool can be downloaded from NuGet. To do that, you can use the following Power Shell script, which downloads all the tools we can use during a project. Execute the script in a Power Shell window:
[Net.ServicePointManager]::SecurityProtocol = [Net.SecurityProtocolType]::Tls12
$sourceNugetExe = "https://dist.nuget.org/win-x86-commandline/latest/nuget.exe"
$targetNugetExe = ".\nuget.exe"
Remove-Item .\Tools -Force -Recurse -ErrorAction Ignore
Invoke-WebRequest $sourceNugetExe -OutFile $targetNugetExe
Set-Alias nuget $targetNugetExe -Scope Global -Verbose

##
##Download Plugin Registration Tool
##
./nuget install Microsoft.CrmSdk.XrmTooling.PluginRegistrationTool -O .\Tools
md .\Tools\PluginRegistration
$prtFolder = Get-ChildItem ./Tools | Where-Object {$_.Name -match 'Microsoft.CrmSdk.XrmTooling.PluginRegistrationTool.'}
move .\Tools\$prtFolder\tools\*.* .\Tools\PluginRegistration
Remove-Item .\Tools\$prtFolder -Force -Recurse

##
##Download CoreTools
##
./nuget install  Microsoft.CrmSdk.CoreTools -O .\Tools
md .\Tools\CoreTools
$coreToolsFolder = Get-ChildItem ./Tools | Where-Object {$_.Name -match 'Microsoft.CrmSdk.CoreTools.'}
move .\Tools\$coreToolsFolder\content\bin\coretools\*.* .\Tools\CoreTools
Remove-Item .\Tools\$coreToolsFolder -Force -Recurse

##
##Download Configuration Migration
##
./nuget install  Microsoft.CrmSdk.XrmTooling.ConfigurationMigration.Wpf -O .\Tools
md .\Tools\ConfigurationMigration
$configMigFolder = Get-ChildItem ./Tools | Where-Object {$_.Name -match 'Microsoft.CrmSdk.XrmTooling.ConfigurationMigration.Wpf.'}
move .\Tools\$configMigFolder\tools\*.* .\Tools\ConfigurationMigration
Remove-Item .\Tools\$configMigFolder -Force -Recurse

##
##Download Package Deployer
##
./nuget install  Microsoft.CrmSdk.XrmTooling.PackageDeployment.WPF -O .\Tools
md .\Tools\PackageDeployment
$pdFolder = Get-ChildItem ./Tools | Where-Object {$_.Name -match 'Microsoft.CrmSdk.XrmTooling.PackageDeployment.Wpf.'}
move .\Tools\$pdFolder\tools\*.* .\Tools\PackageDeployment
Remove-Item .\Tools\$pdFolder -Force -Recurse
Ezt követően megjelenik az Assembly és a Plugin a fő ablak listájában
##
##Remove NuGet.exe
##
Remove-Item nuget.exe
The tools will be downloaded under folder “../Tools/”, and the Plugin Registration Tool is found under “Plugin Registration” where you can run the “.exe” file.
Work with Plugin Registration Tool
After opening the program we need to login to our tenant and select the target environment, then we need to get the following main window, select on the top left “Register > Register new Assembly”:
Now browse the DLL file, which is under folder “Debug” in our VS project after that leave all the options default.
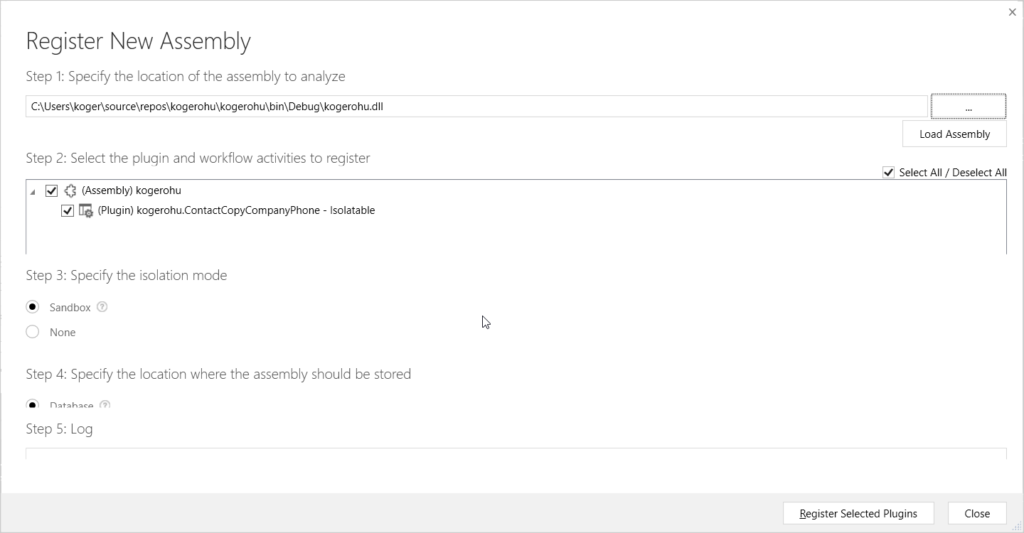
Click on button “Register Selected Plugins”. In case of successful registration you should get something like this:
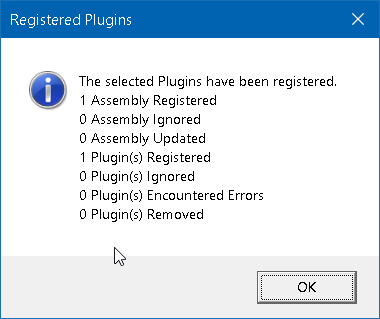
Now after clicking “OK” you should see your plugin on the main window.
Create Plugin step
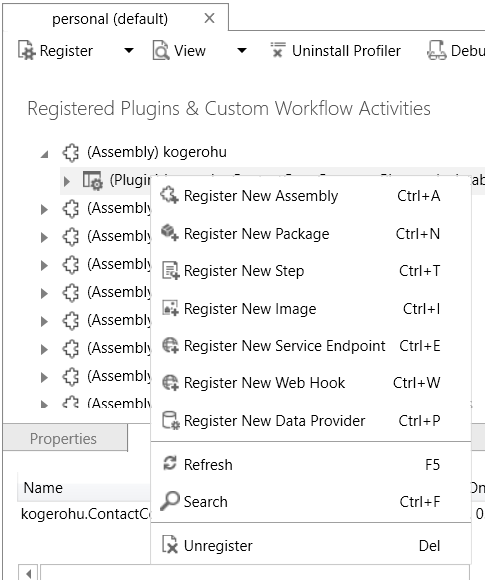
By a successful registration our assembly and plugin will be uploaded to the Dataverse, but it does nothing so far, because we did not defined after what event and when it should run. To fix this we need to create a so called “plugin step”, so browse and select our new plugin from the list and after a right click on it select “Register New Step”.
A new window pops up, fill it in as follows:
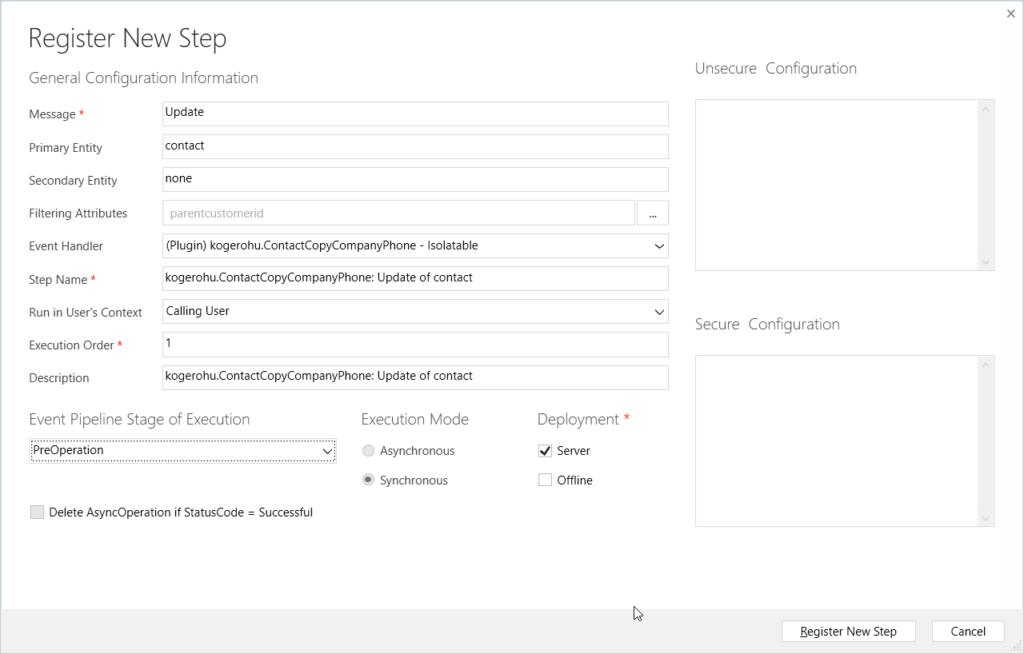
Important to note that I want the plugin to run on event “Update” only for entity “contact” only that case if the field “parentcustomerid” was changed. Do not forget to select the “PreOperation” stage, which helps us to roll back in case of error. If all options are fine, close the window with button “Register New Step”.
If the step registration was successful, it should be appear under our plugin:

Yeah! From now our plugin will be executed if company will be changed on a contact record.
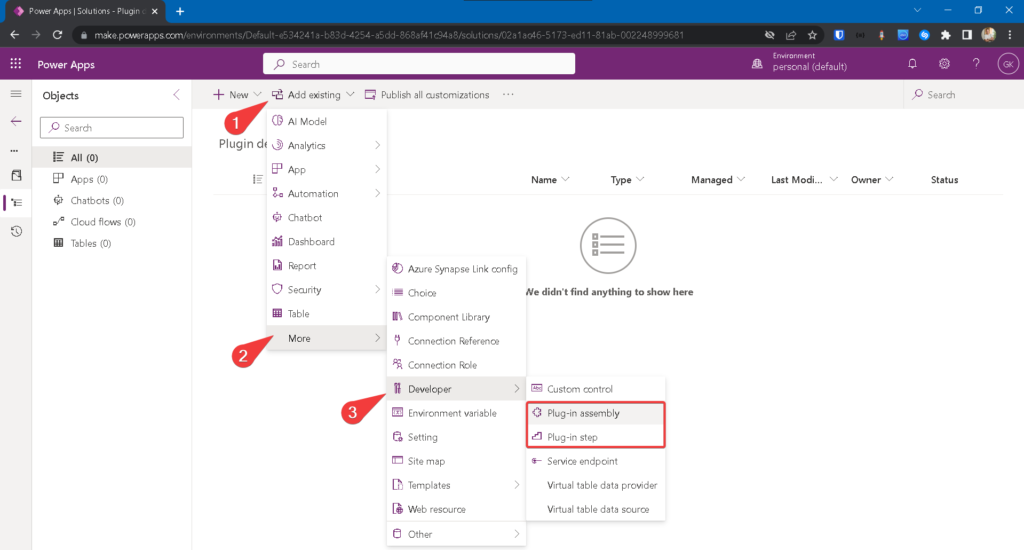
Adding to a Solution
I would like to show how you can find our changes on the maker portal and place them in a solution. Visit make.powerapps.com, then select your environment on the top right. Create a new or select an existing solution and browse plugin assembly and step as follows:
When to use plugin
Instead of using custom code in plugins, you can use workflows to build custom logic as well. Another option is to use Power Automate cloud flows, which is also a no-code low-code tool. Using OOB tools means the customer might not require a programmer for later changes.
Unfortunately all of these tools have their limitations for example in case of Power Automate you logic runs asynchronously which results not having the option to show error message for the user.
As our logic evolves in both tools it can be tool large to have an overview and can be less productive compared to coding.
A few aspects when you might need a plugin in Dataverse:
- If customer does not require only no-code low-code tools in the project, which means the customer might not need a developer for later changes
- If you need custom logic for calculations or validations for fields e.g. tax number validation or the combination of more fields from different tables
- If you need a custom message / event (not covered in this post)
- If you need to show error message to user
- If you do not want to face with limitations during development. Here the only limit is the SDK and C#.
- If customer require a test coverage and tests written in code
Summary
Whereas we covered briefly “event framework” in this post. It helps us to execute custom logic bound to an event in Dataverse. We also created a project in Visual Studio 2022 to write a plugin. Then we checked how to upload it to Dataverse with Plugin Registration Tool.
Finally we checked how to add our changes to a solution.
Sources:

Leave a Reply